- Visit: https://xtrackapp.com/registration/create
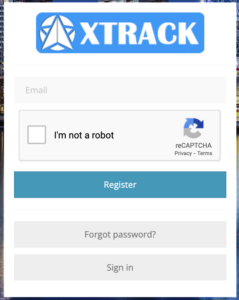
- Register your account.
- Check your email for your login credentials.
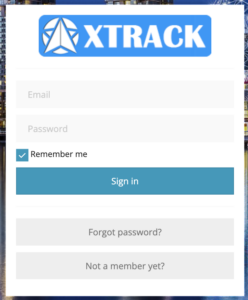
- Sign in at https://xtrackapp.com, using your email and the password provided.
- Select your preferred plan and complete the payment.
- Gain instant access to the XTRACK system.
Adding and Configuring a Device
Add a New Device: On the left panel, navigate to the “Devices” tab and click the “+” icon.

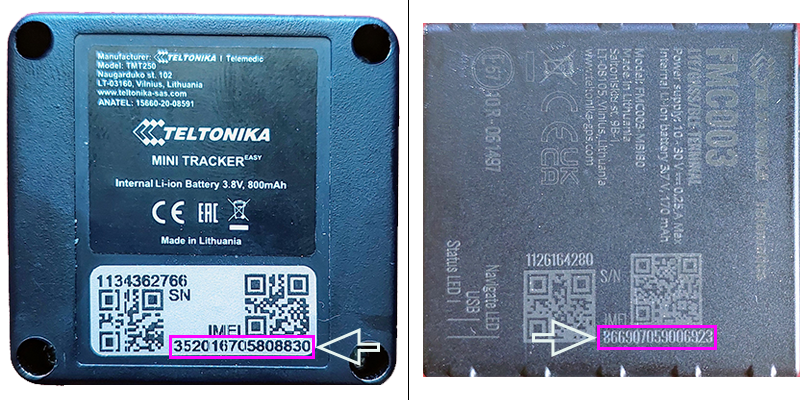
Enter Device Details: A new popup will appear. Choose a name for your device and enter its IMEI number, which is located on a sticker/printed on the device.

Save the Device: After filling in the details, click “Save.” The device will then appear in your device list.
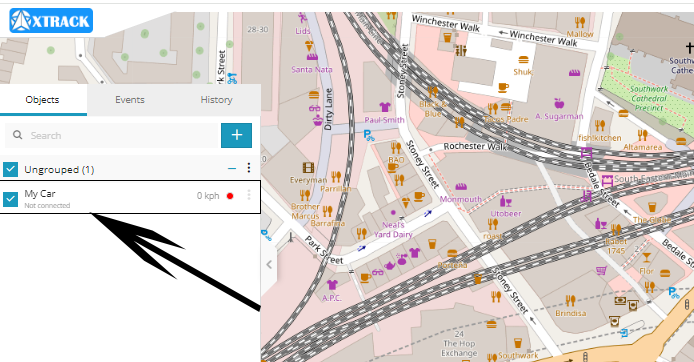
Automatic Configuration: Your device comes preconfigured and will automatically connect to the XTRACK server. Please allow a few minutes for the server to receive the first data packet from your device.
Getting Started: Navigating the XTRACK Platform
After logging in, you will be taken to the main page of the XTRACK platform. This dashboard provides easy access to essential tracking features and settings. You can monitor the position of your objects on the map and obtain detailed information such as speed, address, coordinates, history, and more.
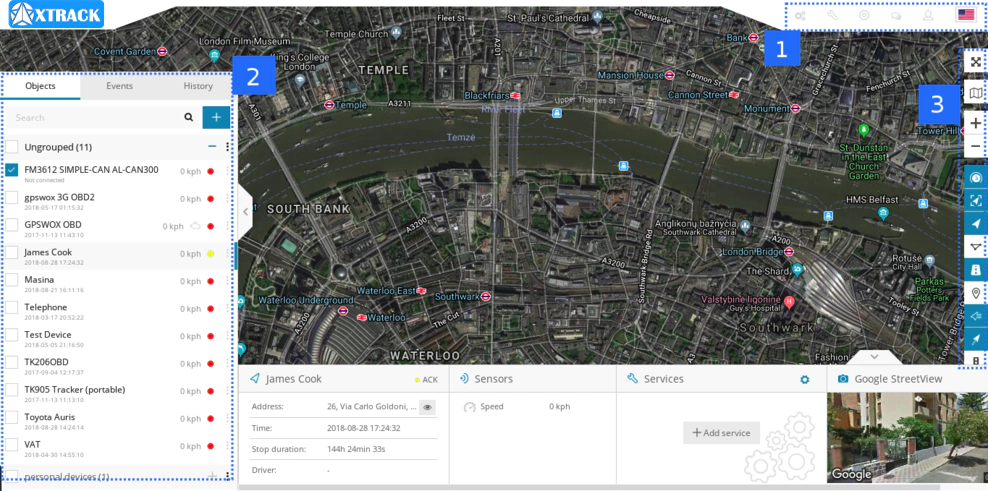
- Menu
- Navigation panel
- Map control
MENU
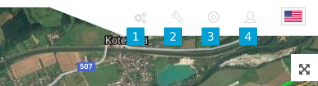
- Admin panel
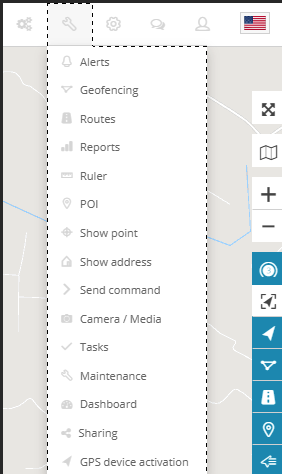
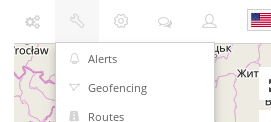
- Tools
- Setup
- Account
The menu allows you to quickly access frequently used tools and settings. You can also easily change your language by clicking the flag icon at the top right corner. For more details, please check the separate user manual pages for Tools, Setup, and My Account.
Navigation panel
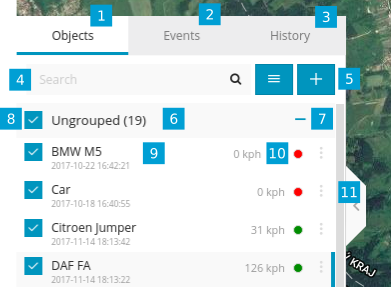
- Objects tab – view and manage all devices
- Events tab – history of events and alerts/notifications can be viewed (e.g., overspeeding, geofence alert, low battery, etc.)
- History tab – view detailed history for each GPS device, including graphs and data logs
- Search – find devices by name or IMEI
- Add device – add new GPS devices
- Groups – group name and number of devices in that group
- Groups expander – expand or collapse groups
- Visibility checkbox – turn on or off objects’ visibility on the map
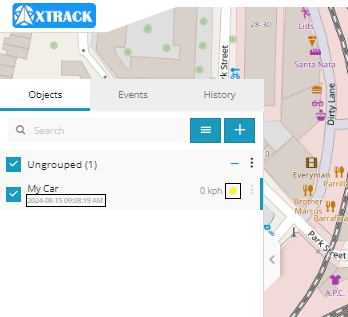
- Object information – device name, date, time of last received location, online/idle/offline status
- Speed – shows current object speed
- Edit Object – change device icon, assign to a group, add and manage sensors, follow accuracy settings, and more
Object details panel
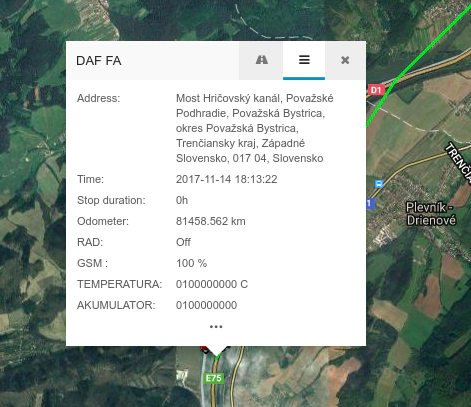
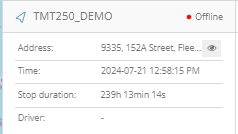
This panel allows you to see more information about an object. It appears when you select your object. There are 2 options: show less (standard) and show more.
In the show less popup, you will see the address, stop duration, and sensors. In the show more popup, you will see additional information like services, protocol, and more.
Map control
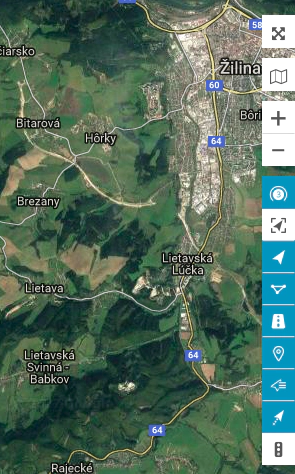
- Full screen mode – hides all tools and shows only GPS devices on the map
- Change map – change the map to streets, satellite, and more
- Zoom – zoom in and out on the map
- Objects tickbox – show or hide objects on the map
- Geofences tickbox – show or hide geofences on the map
- Routes tickbox – show or hide routes on the map
- POI tickbox – show or hide Points of Interest (POI) on the map
- Show names – show or hide object names above icons on the map
- Show tails – show or hide object trails on the map
Membership
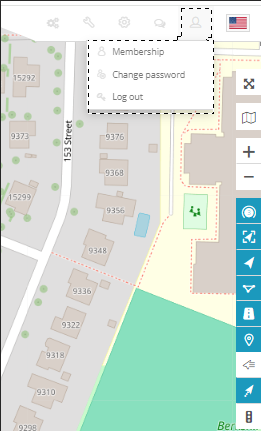
In the membership window, you can review your subscription plan, device limit, expiration date, and your account email. To upgrade your membership, please visit https://xgpstrackers.com.
Change Password
To change your password, click “Change password,” and you will be redirected to a new form where you can update your password.
Log Out
Click “Log out” to exit the XTRACK GPS platform.
Setup Window
In the setup window, you can configure multiple settings for all your GPS trackers, create groups, drivers, and more.
Main
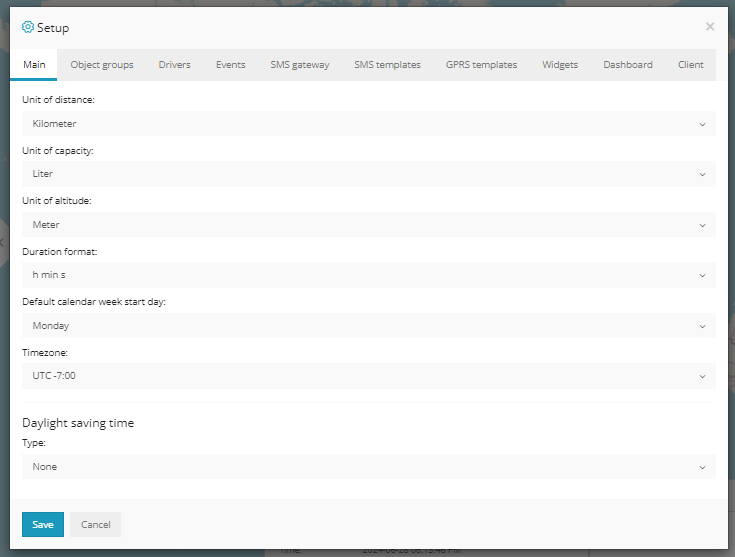
In the main tab, you can define speed, capacity, and altitude measurements, and also select the timezone for all your GPS trackers. For daylight saving time (DST), it is recommended to use the Automatic option and select your own country.
Object Groups
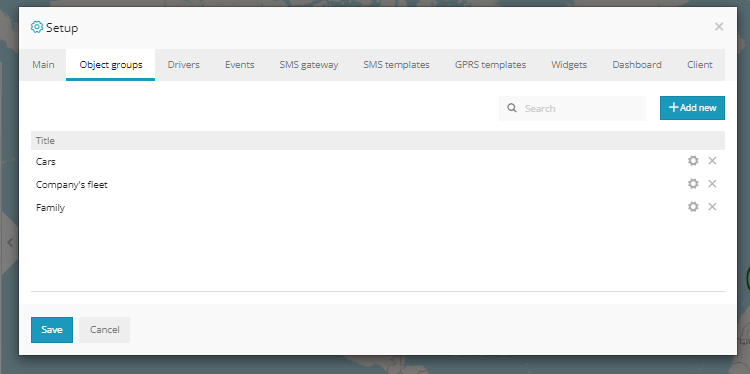
In the “Object groups” tab, you can create groups for your GPS devices. To assign a device to your created group, go to Object > Edit > Advanced > Group, select your created group, and click Save.
Drivers
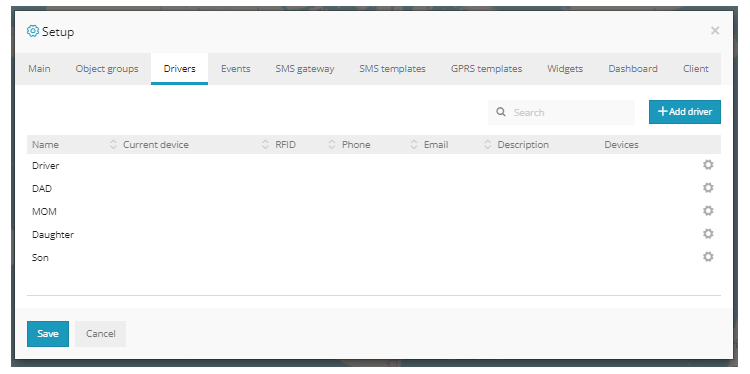
Here you can create drivers. Click “Add driver” to create one. Type in any name and select your GPS device. If your device has an iButton or RFID, type in the RFID/iButton number in the RFID field. XTRACK automatically identifies the GPS device protocol and decodes the RFID message. After creating a new driver, swipe the card/item over your RFID device, and you should see the driver’s name in the left bottom panel or by clicking on the object.
The easiest way to add sensors to your device is by using the predefined sensor groups available in the application.
Navigate to Object > Edit Object >
Then Sensors > Sensor Group.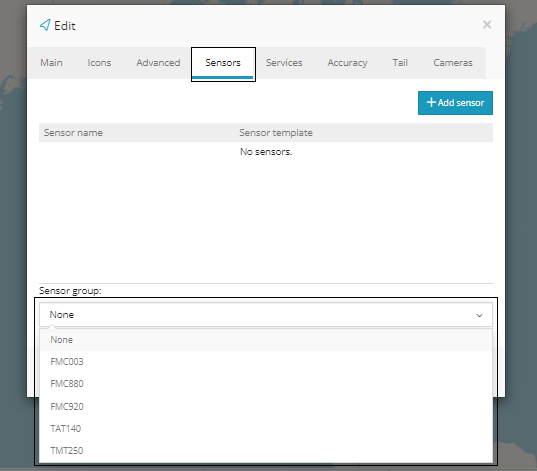
Choose the sensor group that corresponds with your device model, then click “Save” to apply the selected sensors to your device.
Setup Window
In the setup window, you can configure multiple settings for all your GPS trackers, create groups, drivers, and more.
Main
In the main tab, you can define speed, capacity, and altitude measurements, and also select the timezone for all your GPS trackers. For daylight saving time (DST), it is recommended to use the Automatic option and select your own country.
Object Groups
In the “Object groups” tab, you can create groups for your GPS devices. To assign a device to your created group, go to Object > Edit > Advanced > Group, select your created group, and click Save.
Drivers
Here you can create drivers. Click “Add driver” to create one. Type in any name and select your GPS device. If your device has an iButton or RFID, type in the RFID/iButton number in the RFID field. XTRACK automatically identifies the GPS device protocol and decodes the RFID message. After creating a new driver, swipe the card/item over your RFID device, and you should see the driver’s name in the left bottom panel or by clicking on the object.
Object Popup
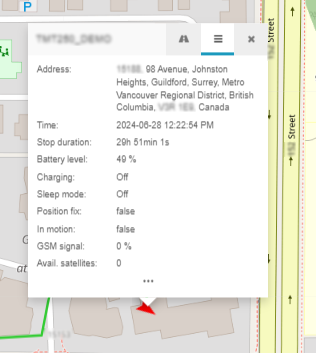
In the minimized popup window, you can monitor basic information and sensors. Once you click “Show more,” you will see all available information for this device including sensors, services, and additional data. If you want to check what parameters your device is sending, please visit the sensor management section.
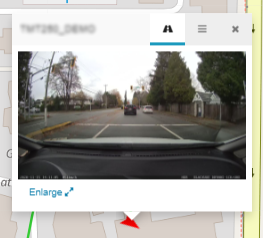
It is also possible to use “street preview” while monitoring your device. This window will refresh automatically once your device is moving, so you can view “street preview” in real time.
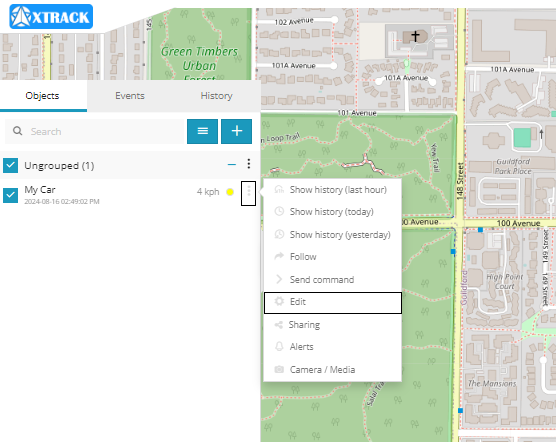
OBJECT QUICK MENU
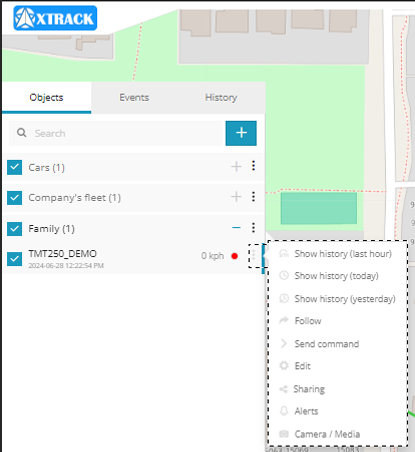
- Show history – This will instantly show the history of the object for the most common selected period.
- Follow – A new window will appear where you will be able to monitor each object individually. You can open multiple windows at the same time.
- Send command – Quick access to send a command to the device via GPRS or SMS.
- Edit – Edit device name, IMEI, accuracy, change icon, add services, and more.
EDIT – MAIN

To add a device, all that is required is the name and device IMEI or identifier. You can edit the name and IMEI anytime.
EDIT – ICONS
![]()
Icon type:
- Arrow – An arrow with direction and color (green, yellow, red) will be shown. This is the default and recommended selection as it gives you the most control and information.
- Rotating icon – A vehicle icon visible from the top will be shown, and it will rotate according to the direction.
- Icon – A simple icon will be shown without direction and status.
Icon type – Arrow. There are 4 states:
- Moving – When the device speed is higher than the minimum speed defined in Edit > Accuracy > Min. moving speed.
- Stopped – When the device speed is lower than the minimum speed defined in Edit > Accuracy > Min. moving speed.
- Offline – If the device is not sending information to the XTRACK server for 60 or more minutes or is disconnected from the XTRACK GPS server. For Some GPS trackers it is normal to appear offline as they go to sleep for a certain period longer than 60 min, depending of their configuration.
- Engine idle – For engine idle to be active, you need to add a sensor for ignition on/off or engine on/off and then add those sensors in Edit > Accuracy > Engine hours (switch from GPS). Engine idle means that ignition/engine is on but the device is not moving.
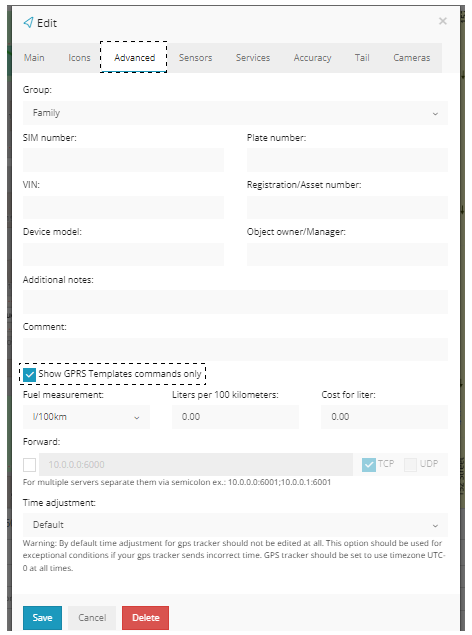
EDIT – ADVANCED
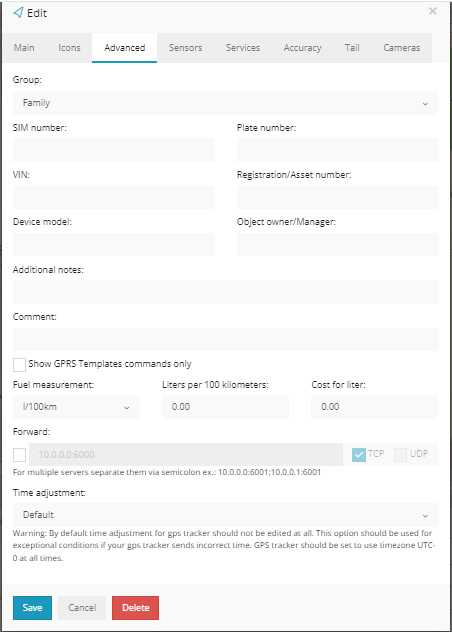
In the advanced section, you can fill in optional information, assign the device to a group (to create a new group, please go to Setup > Groups > Add).
Show GPRS Templates commands only – If you tick this option, then only custom GPRS commands will be shown for your device in Tools > Send command. GPRS templates can be created in Setup > GPRS Templates.
Fuel measurement – If you do not have fuel sensors connected to your GPS device, you can input measurements here so the XTRACK will calculate the theoretical fuel consumption based on the distance travelled in history and reports.
Forward – The platform will copy and send raw device data to the given IP and port in a UDP or TCP connection.
Time adjustment – This will manually adjust the time individually for the selected GPS device. Used only in cases when you are unable to set the timezone to UTC 0 for your device.
EDIT – SENSORS
Please check the sensor management section for detailed documentation.
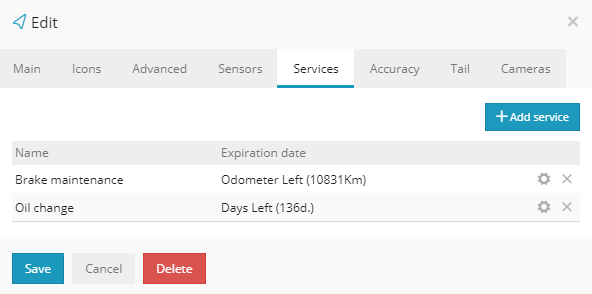
EDIT – SERVICES
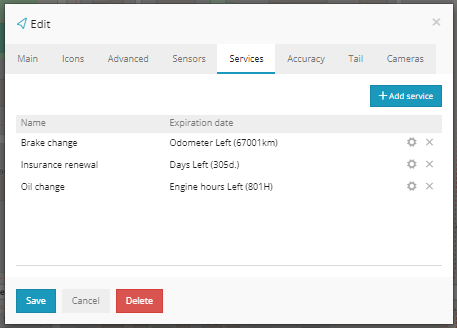
Services are used to monitor insurance, technical maintenance, oil change, car parts depreciation, etc.
EDIT – ACCURACY
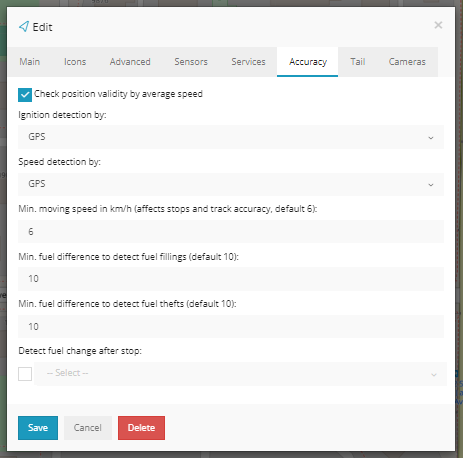
Engine hours – The default selection is GPS, but if you have an ignition or engine sensor connected to your GPS tracker, it is highly recommended to select it here. Once selected, if ignition is off you will not see unnecessary history (like drifting), engine hours, distance, events like geofence or overspeed will not be triggered, therefore you will get the most accurate information including reports.
Min. moving speed – If speed is below the minimum speed, movement will not be registered. We recommend adjusting the default minimum moving speed to 1 km/h on devices like the TMT250, especially when tracking individuals or pets, to enhance tracking accuracy.
Min. fuel difference to detect fuel fillings – If sensor value increases instantly by 10 units or more, fuel filling will be detected.
Min. fuel difference to detect fuel thefts – If sensor value decreases instantly by 10 units or more, fuel theft will be detected.
To prevent the platform from registering false movement when staying at one location and GPS points are not accurate, the “Min. Moving speed” value should be increased. Additionally, if the device has an ignition sensor, adding it will stop the platform from registering location points when the object’s ignition is off.
EDIT – TAIL
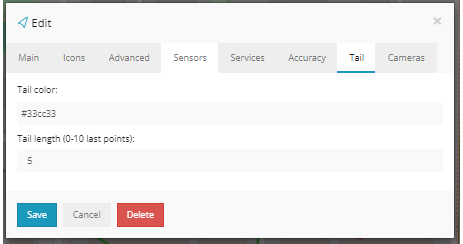
Tail color – Select the color of the object tail.
Tail length – Define how long the tail is.
TRACKING TOOLS OVERVIEW
Tools are used to create alerts/notifications, geofences, Points of Interest (POIs), send commands to GPS trackers, generate reports, and much more.
TRAKING ALERTS
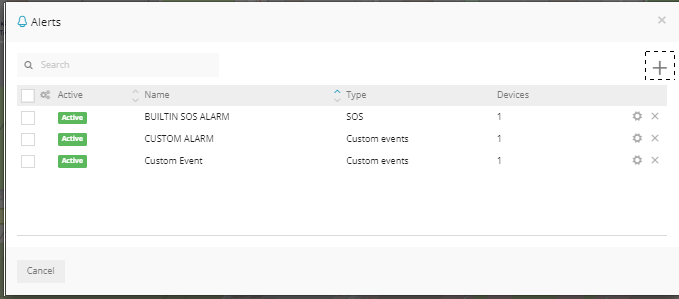
To create an alert, choose “Alerts” in the “Tools” menu on the main map window and press the “Add alert” button (blue “+” symbol icon) on the alerts panel.
A new panel window will open. Start creating an alert by clicking the Plus button on the top left side of the alert window filling in the required information.
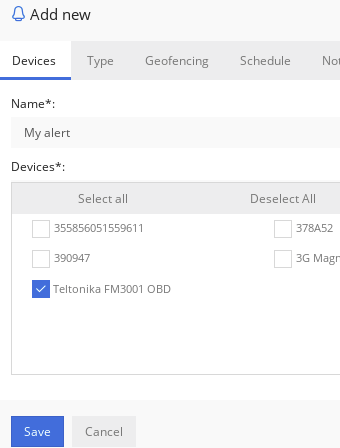
Devices
Enter the alert name (required) and select objects/GPS-devices (required) for which the alert will generate.
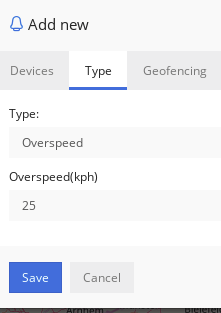
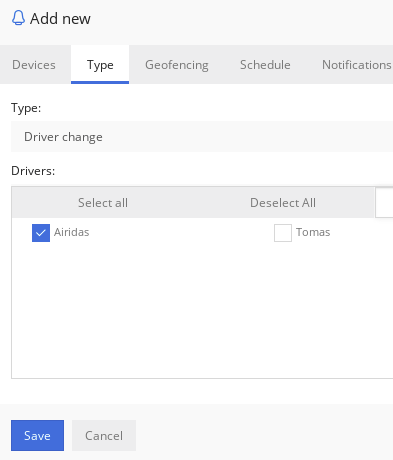
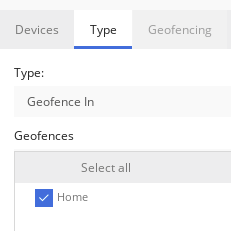
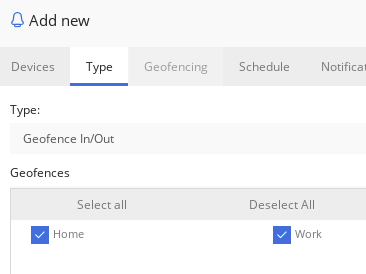
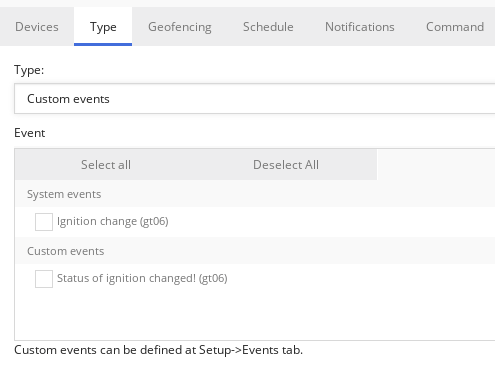
Type
Select the alert type from the list. There are 7 types described as follows:
- Overspeed – This alert will generate when objects/GPS-devices exceed the speed value entered.
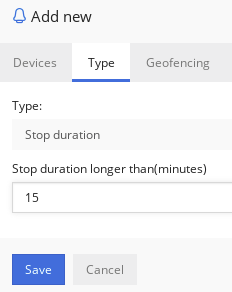
- Stop duration – This alert will generate when an object/GPS-device is not moving for the defined time in minutes.
- Driver change – This alert will generate when the driver on the object/GPS-device changes from the selected drivers in the list.
- Driver change unauthorized – This alert will be generated when the driver’s RFID is not found or the device is not assigned to a specific driver.
- Geofence In – This alert will generate when an object travels into a geofence.
- Geofence Out – This alert will generate when an object travels out of a geofence.
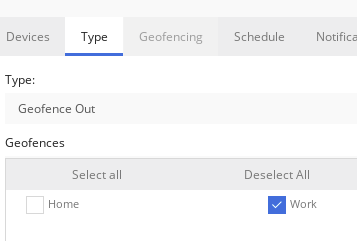
- Geofence In/Out – This alert will generate when an object travels in or out of a geofence. Note that when selecting “Geofence In,” “Geofence Out,” or “Geofence In/Out” alert types, the “Geofencing” tab will be disabled.
- Custom events – This alert will generate when user-created custom or system-wide events are generated.
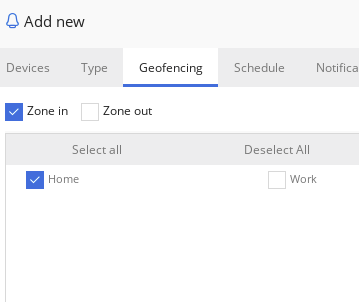
Geofencing
Select geofences that will generate an alert when an object moves inside or outside a geofence. This will work together with other types of alerts. For example, it will generate an overspeed alert only when moving inside or outside a geofence.
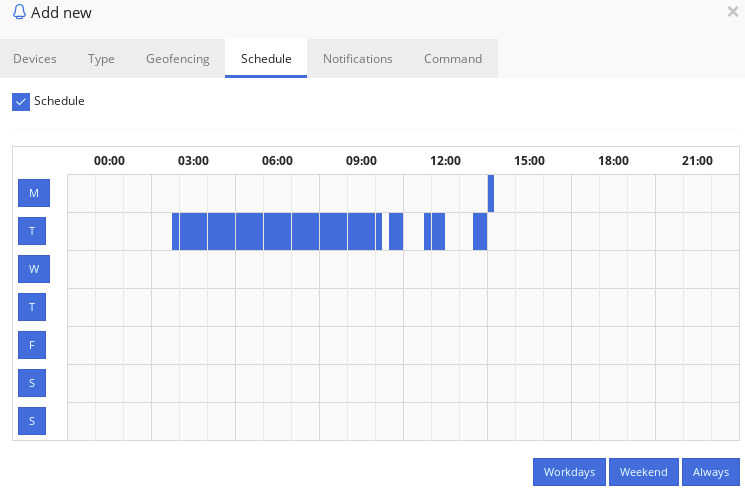
Schedule
Select when the alert will be active. Press and drag the mouse on the calendar table. One table item represents 15 minutes. The exact timestamp can be seen by hovering over the item with the mouse.
Notifications
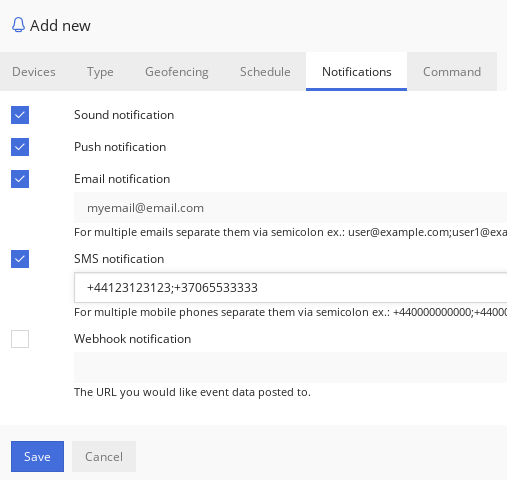
Select which notifications a user will get when an alert generates.
- Sound notification – makes a sound on the web browser once an alert generates.
- Push notifications – works on mobile apps.
- Email notification – sends an email.
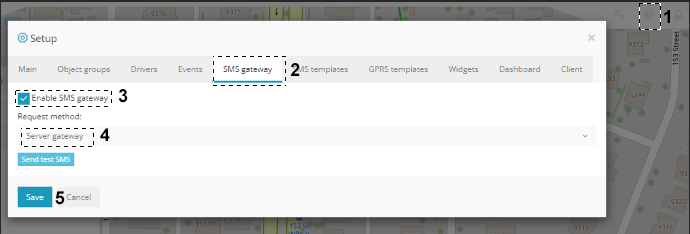
- SMS notifications – will be sent to the numbers provided. SMS Gateway must be enabled to show this part of Notifications:
- To enable the SMS Gateway, navigate to
Setup>SMS Gateway>Enable SMS Gateway, then selectRequest Method: Server Gateway, finally save the settings.
- To enable the SMS Gateway, navigate to
Command
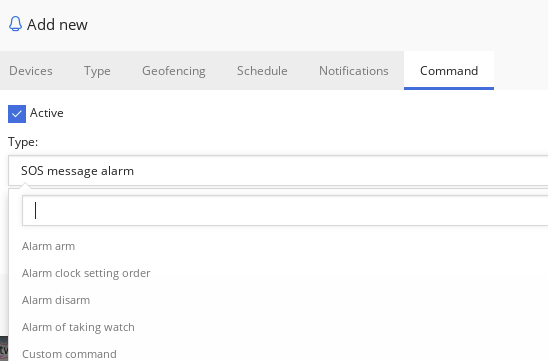
Select the command to activate when an alert generates. The command will be sent to the device through the GPRS network.
Pressing the “Save” button will complete the alert creation steps and close the alert creation window.
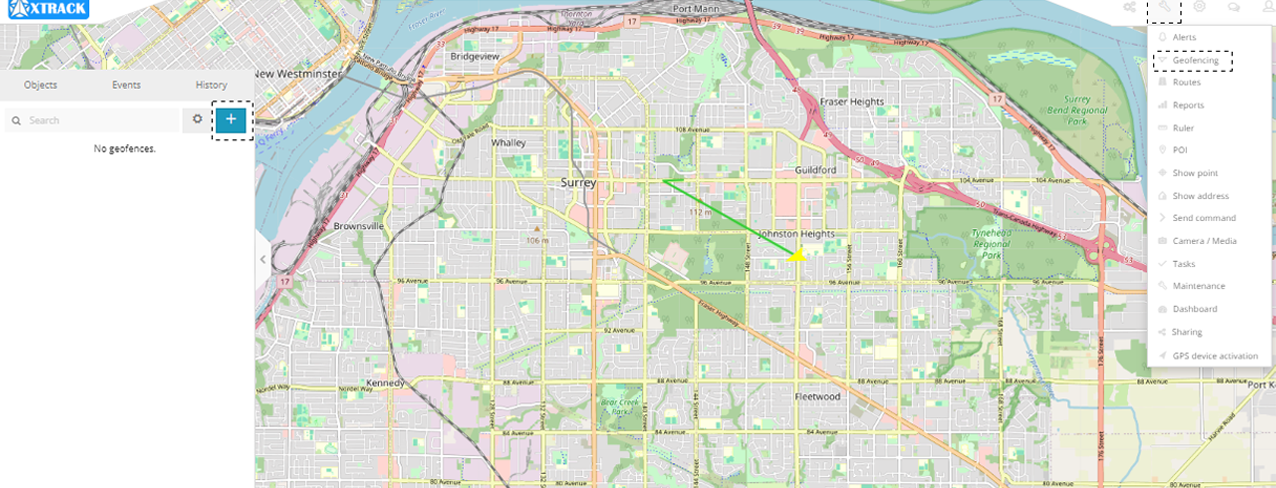
Create a Geofence
To create a new geofence, click Tools > Geofencing > Add geofence.
Type in the geofence name and select its color, then click on the map to begin drawing the geofence. When you finish drawing the geofence, double-click the last point and click Save.
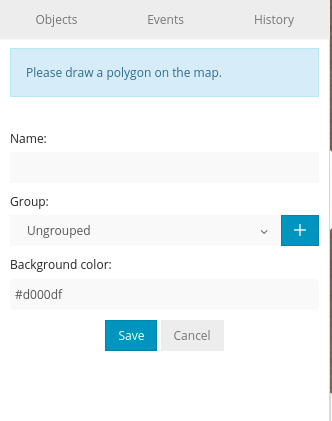
Once the geofence is created, you can view them all on the list and edit them anytime.
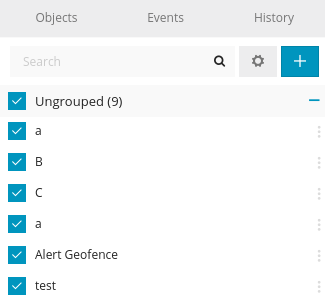
Import and Export
To import or export a geofence, click the button with a gear icon:
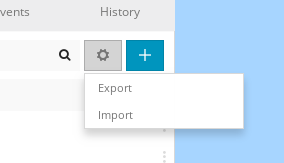
For export, you can select single, by groups, active, and inactive geofences:
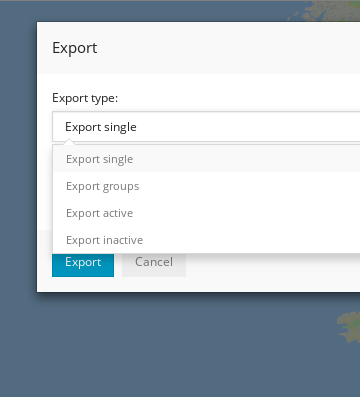
The export is saved in a .gexp file.
Main
To create a new report or schedule it, click Tools > Reports.
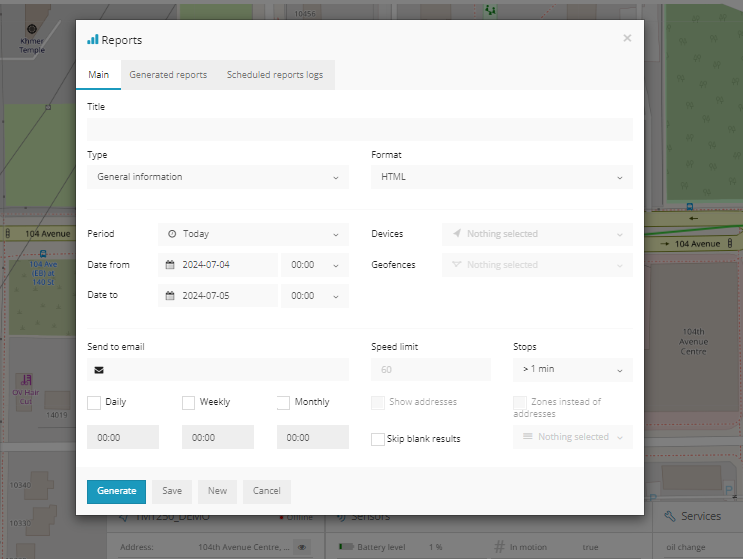
Report
Title – report title/name
Type – select report type
General information – report shows some basic information: top speed, average speed, consumed fuel, route length, etc.
General information (merged) – general information displayed in a row.
Drives and stops – same information as general report but added: objects stops and driving information, like duration of intervals between stops, address where object stopped.
Travel sheet – displays coordinates and addresses of stops, fuel consumption, length between stops.
Overspeeds – speeding cases will be displayed in the report as well as additional information such as excess time, how much speed has been exceeded.
Underspeeds – underspeeding cases will be displayed in the report.
Geofence in/out – entry/exit time in each zone and out zone, stay time in zone.
Events – events information: event name, coordinates and address, time.
Fuel level – information about fuel level changes.
Fuel fillings – object fuel fillings history.
Fuel thefts – object fuel thefts history.
Format – select the format that the report will be generated: PDF (for viewing in Adobe Acrobat Reader), HTML (for viewing in browser), XLS (for viewing and editing in Microsoft Excel)
Show addresses – near to location points addresses will be shown.
Zones instead of addresses – instead of addresses, zone names will be shown.
Stops – set time of stops to eliminate traffic light stops.
Speed limit (kph) – speed limit for Overspeed and Underspeed reports.
Schedule
Daily – reports will be sent every day for the previous day.
Weekly – reports will be sent once a week, every Monday for the previous week.
Send to e-mail – enter e-mail addresses separated by commas to send reports to.
Devices
Select devices to create the report.
Geofences
This allows you to select zones whose details will be seen in the report. Zone selection is available only if the Report type Zone in/out is chosen.
Time period
Filter – easy way to set time period.
Time from/ Time to – set the time period of the report.
Generated reports
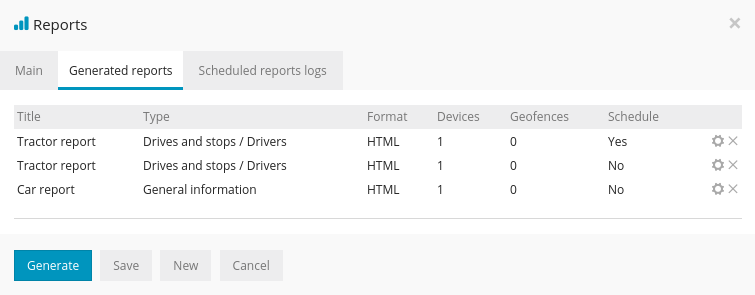
All generated reports can be visible in this tab. You can modify, regenerate, and delete them.
Scheduled reports logs
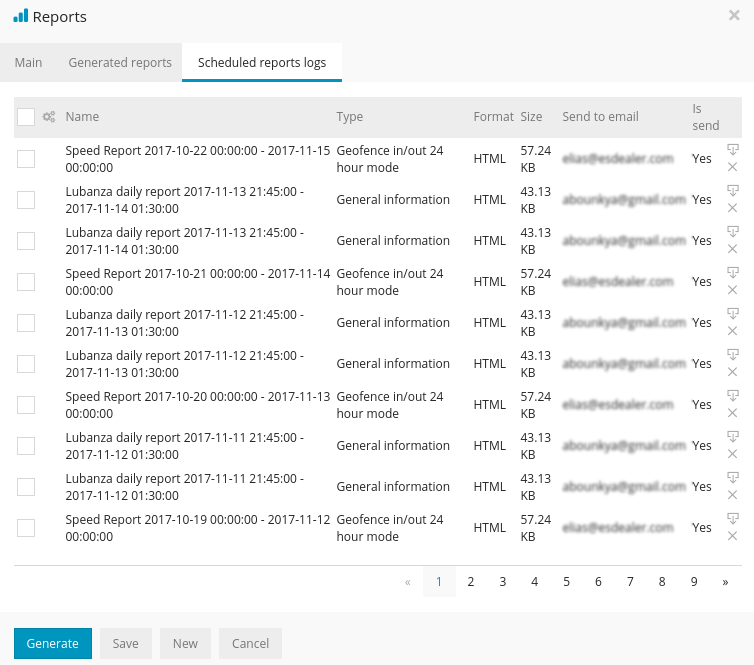
All scheduled generated reports. In case you did not receive them via email, or don’t need them, you can review them all here.
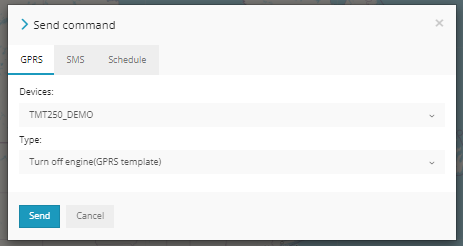
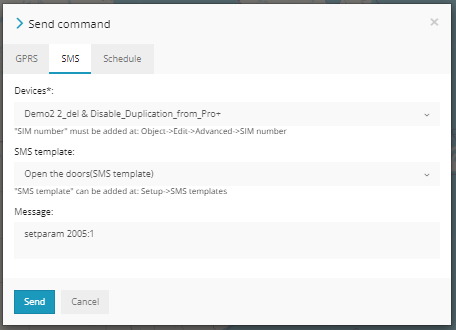
HOW TO SEND COMMANDS TO GPS TRACKERS
Commands can be sent via GPRS or SMS (SMS gateway must be enabled: Setup > SMS).
Type – If you select a custom command, you will be able to send a RAW GPRS command to the device or select a GPRS template you created in Setup > GPRS Templates.
If you want to see your specified GPRS commands for the selected device only, please go to Objects > Edit > Advanced > Show GPRS templates only.
In order to send an SMS command to the device, the SMS gateway must be enabled (Setup > SMS).
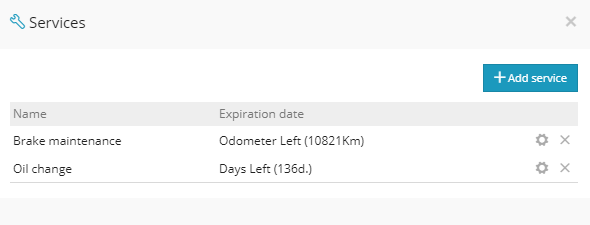
HOW TO ADD MAINTENANCE & PERIODIC SERVICES
With the maintenance tool, you can set up a vehicle/equipment maintenance schedule to remind you of when the next vehicle/equipment service is due.
To open the maintenance tool, either select the Services tab within the object’s details, or enable the Service widget in Setup > Widgets, which appears at the bottom of the map when selecting the gear icon.
Accessing the Maintenance Tool
Via object’s details:
Via Service widget by selecting the gear icon:
After opening the maintenance tool, the following screen will appear, displaying the current schedules added. To create a new schedule, select Add service.
Once selected, you will be prompted to enter the following information:

- Name: In this field, you can add a name for the scheduled service.
- Expiration by: This is used to set up an expiration when the vehicle reaches a specific interval for one of the following options:
- Odometer
- Engine hours
- Days
- Interval: Setting a specific odometer, engine hours, or day intervals when the vehicle is due for maintenance.
- Last service: Used to enter a value when the vehicle was last serviced (odometer, engine hour, or date value).
- Trigger event when left: A value to be entered if an alert should be triggered when there is a specific amount left before the service.
- Renew after expiration: Automatically renews the service schedule.
- Description: A brief description of the service.
- Email/Phone number: Required if an alert needs to be sent before the vehicle’s service.
To view all of the created maintenance schedules, navigate to Tools > Maintenance.

Dashboard window
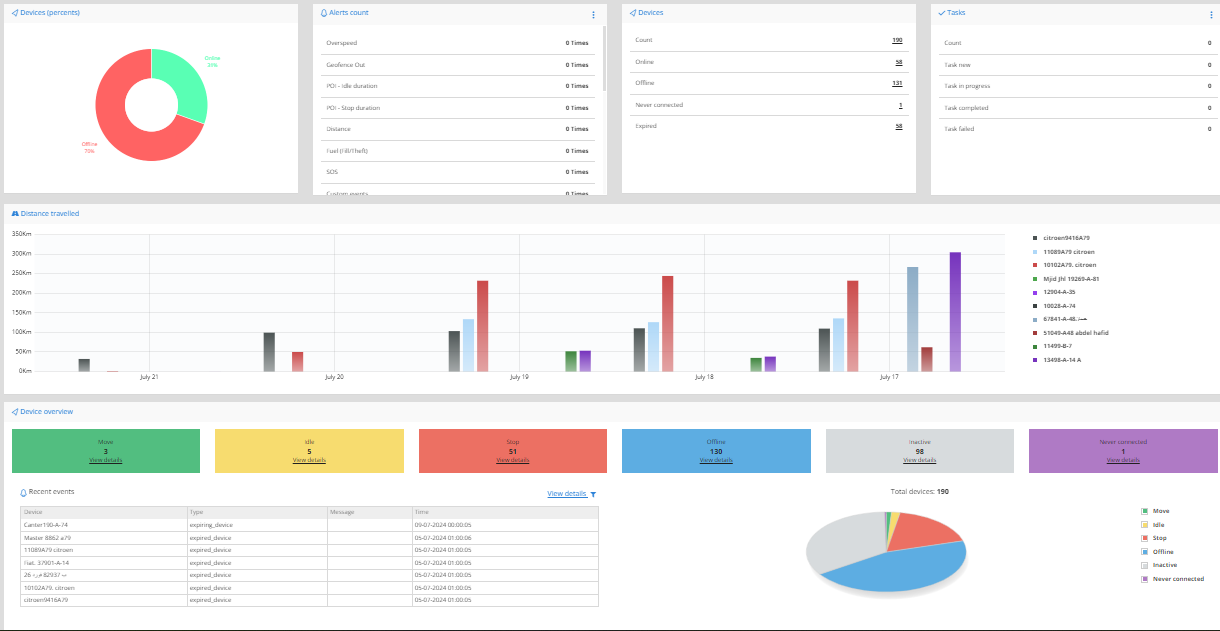
The dashboard feature is used to display useful information in a more comprehensive way. It can be used to display device activity, events, device count (online/offline), task count and progress, and the distance traveled by the devices.
It can be opened manually or by setting up the dashboard to open every time you open the map.
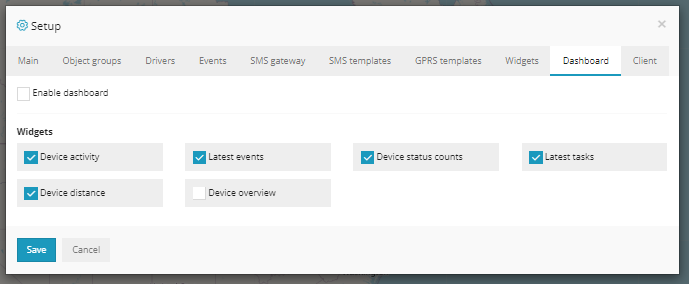
To enable the dashboard to open automatically and to enable which information to display, navigate to Setup > Dashboard.
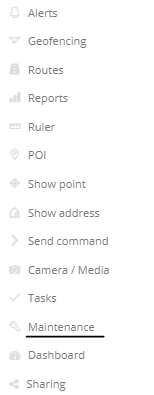
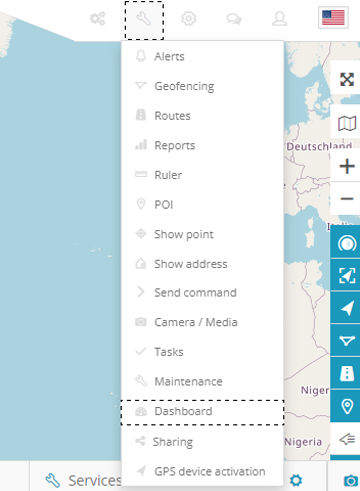
To open the dashboard manually, navigate to Tools > Dashboard.
An overview of the dashboard:
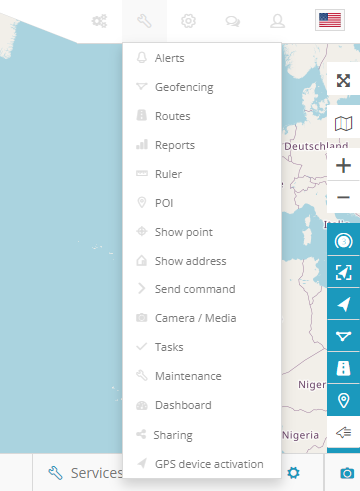
Tracking sharing
The Sharing tool is used to create a shareable link to track GPS objects without having to log in to the web platform.
To access the Sharing tool menu, navigate to Tools > Sharing.
Once opened, you will be greeted with the following popup:
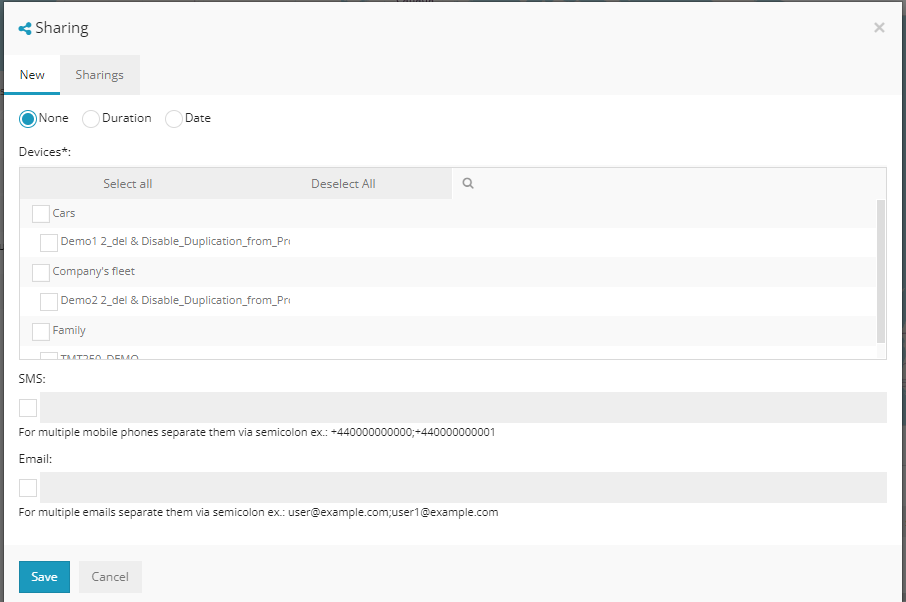
To create a shareable link, select the devices from the list that you’d like to be displayed on the map for others to see.
There are 3 options for durations:
- None – The link will last indefinitely until it is deleted.
- Duration – The link will be accessible for a specific duration, up to 180 minutes.
- Date – A specific date can be set until the sharing link will expire.
Delete after expiration – This option is available when an expiration time/date is set for the link to delete it once it is expired.
Below the devices, there is an option to enter an email(s) to send a link as soon as it is created.
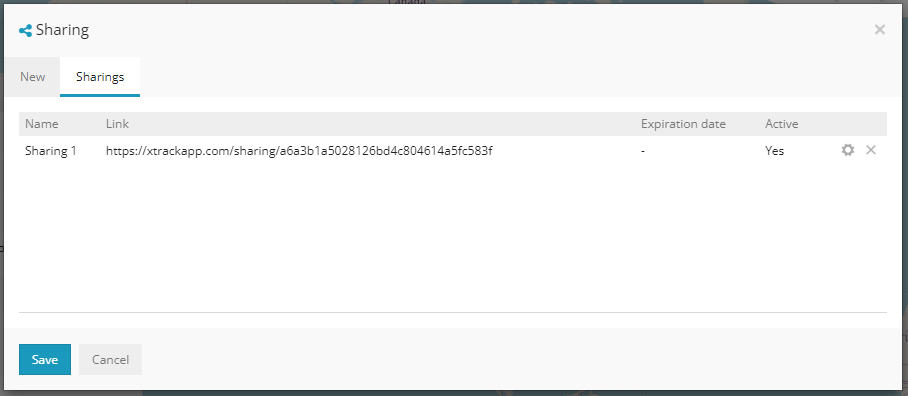
To view, edit, and delete the created sharing links, navigate to Sharings from the top of the menu.
Widgets
You can edit which widgets you would like to see on your main map using Setup.
By disabling ‘Default widgets’ you can add or remove them.
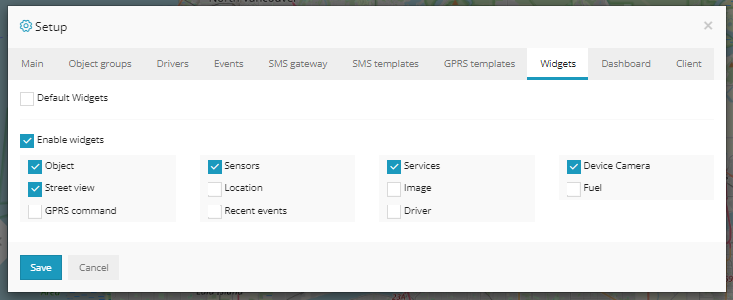
The selected widgets will appear at the bottom of the main map:
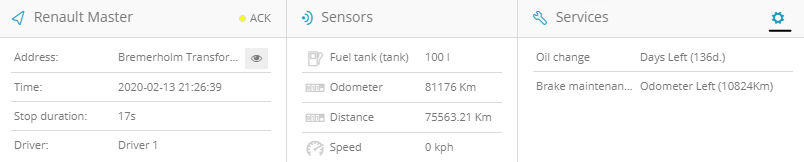
Object
The object widget displays the device’s information, such as the address, time, stop duration, and the driver occupying the vehicle.
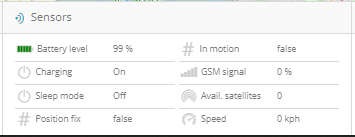
Sensors
It shows all of the added sensors for the vehicle – fuel level, ignition status, current speed. Many more sensors can be set up and displayed.
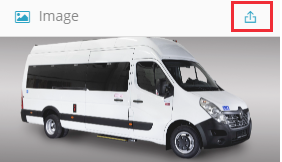
Device Image
The device image widget provides the ability to add the vehicle’s image on the main map. To upload the image of the device, select the “upload” button in the top right corner of the widget and upload the image that you would like to be displayed.
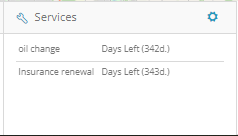
Services
This widget displays all of the maintenance services created and due date/interval for the object. Check the guide above explaining how to create such services in the TOOLS >> MAINTENANCE page.
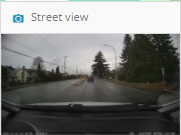
Street View
The Street View widget shows the object’s current location from Google Street View.
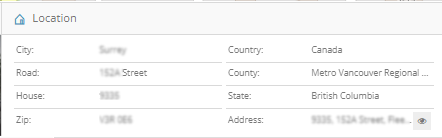
Location
Displays more detailed information about the object’s location, such as the city, road name, house number if parked close, and the ZIP/Postal code.
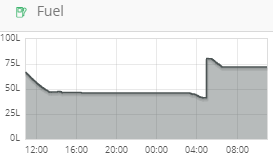
Fuel
Displays a graph of the fuel level. Data displayed is gathered from the fuel sensor.
Reporting
Events
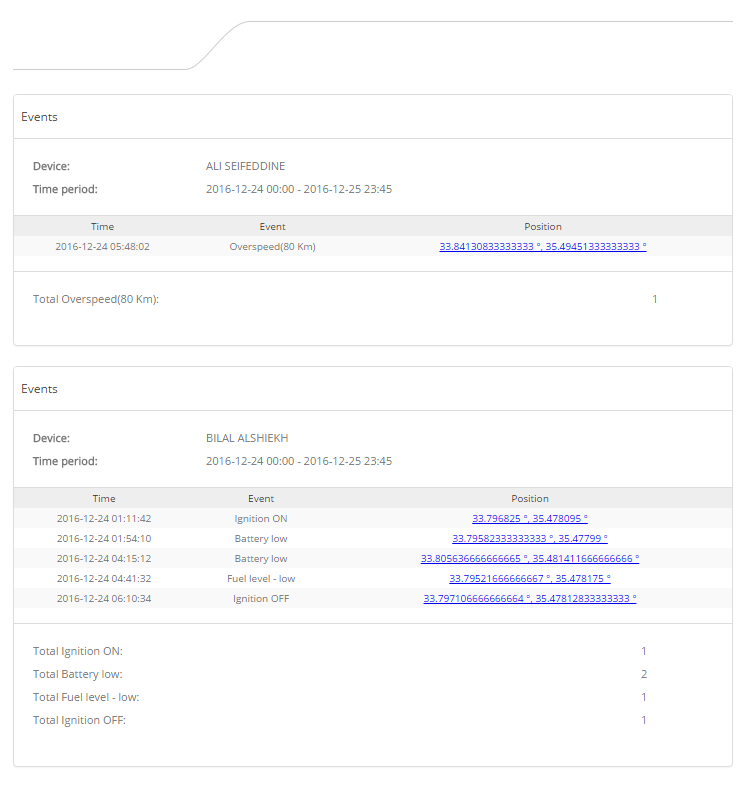
Summary of all triggered events and alerts.
Drives and Stops
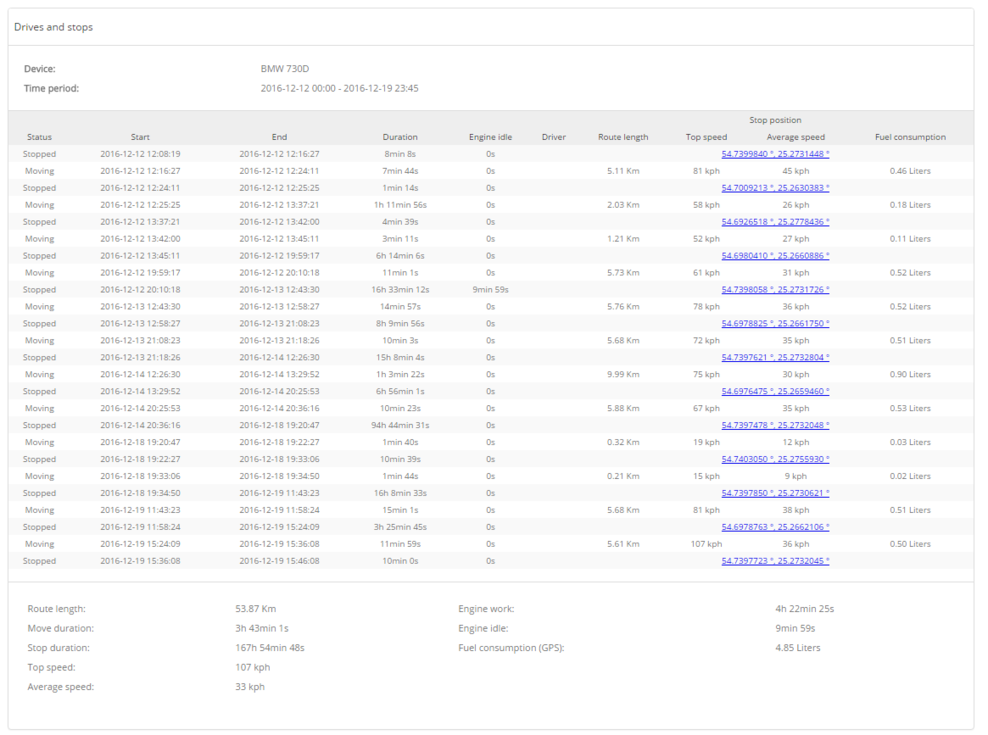
This report shows how many times a device was moving and stopping, the duration of each move/stop, route length, and additional information. If a fuel sensor is configured, fuel consumption will be calculated automatically in the report by fuel sensor values.
- Drives and stops / Drivers: Drives and stops sorted out by each driver.
- Drives and stops / Geofences: Shows drives and stops in geofences.
Engine Hours Daily

This report displays the total engine hours for the whole day.
Fuel Level
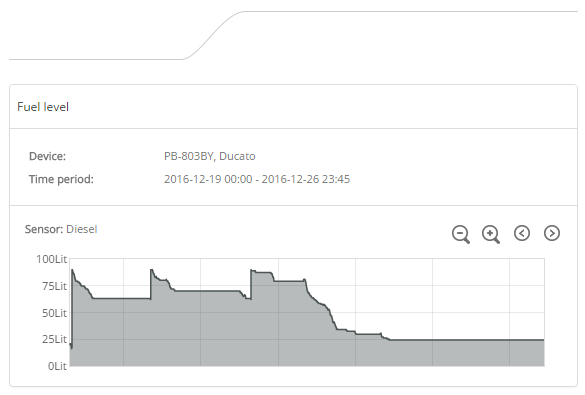
Displays fuel level for the selected period. A fuel sensor must be configured before using this report.
Fuel Fillings
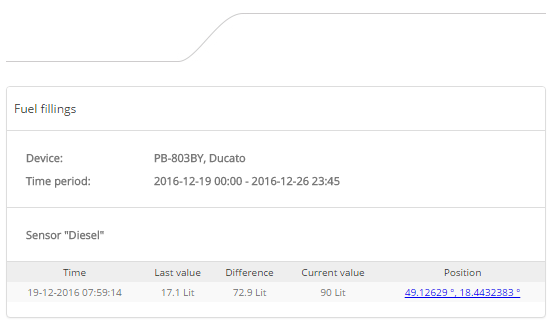
Displays fuel fillings for the selected period. A fuel sensor must be configured before using this report. Fuel fillings detection can be configured in Objects -> Edit -> Accuracy (same for fuel thefts report).
General Information
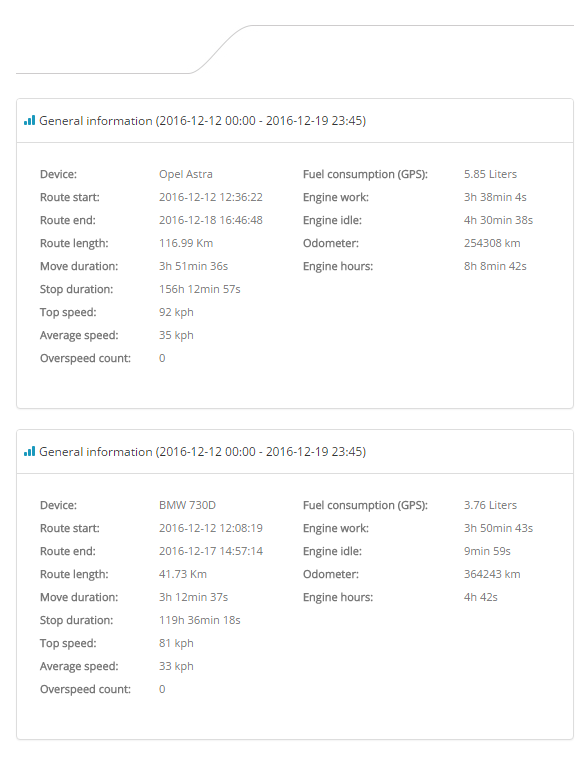
Summary of all selected GPS devices about routes, distance traveled, move duration, overspeed count, fuel consumption, engine hours, etc.
General Information (Merged)
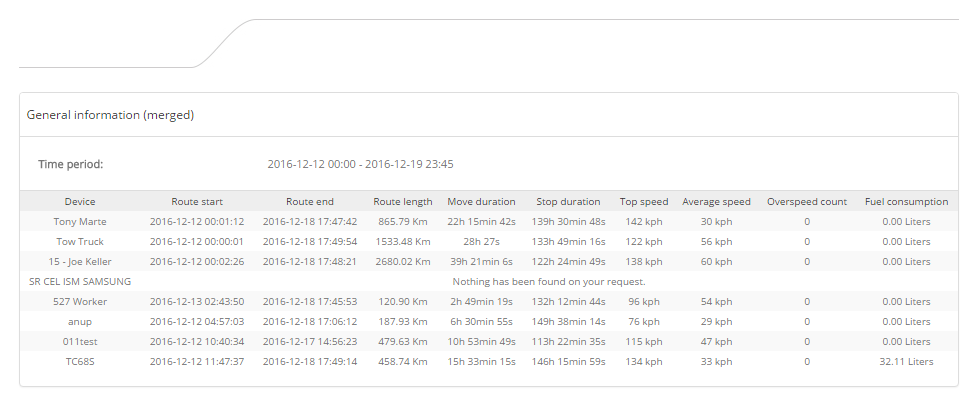
Same as the general information report, but merged into one table.
General Information (Merged) Custom
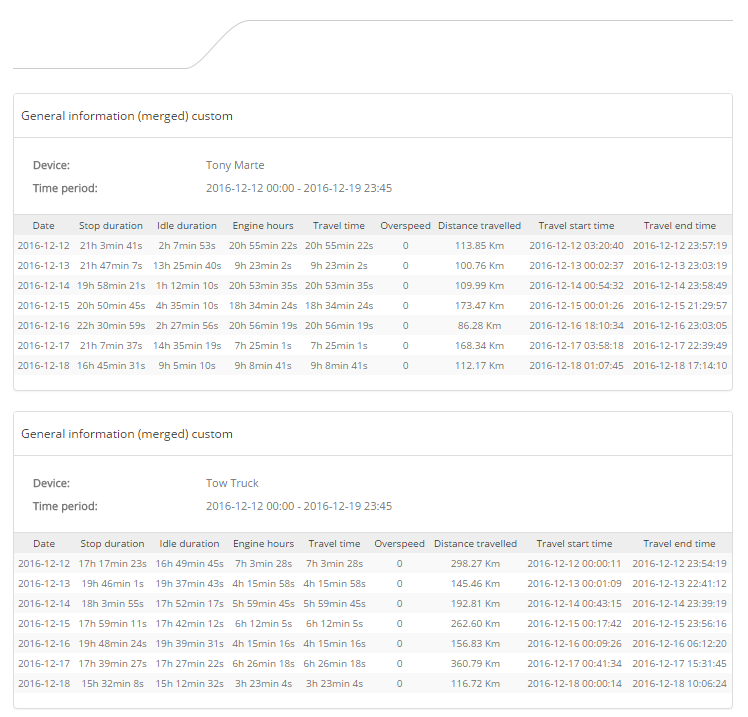
Same as the general information report, but split into multiple tables by GPS device.
General Information (Merged) Custom 2

Layout is similar to the merged reports with additional information added, such as move/stop duration, stop count, overspeed count, etc.
General Information (Merged) Custom 3
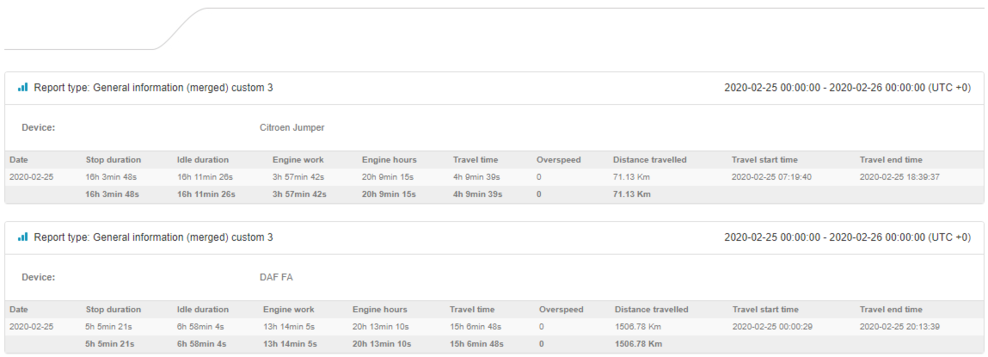
Displays the same information as General Information (Merged) Custom, but each device’s information is split into different tabs.
Geofence In/Out
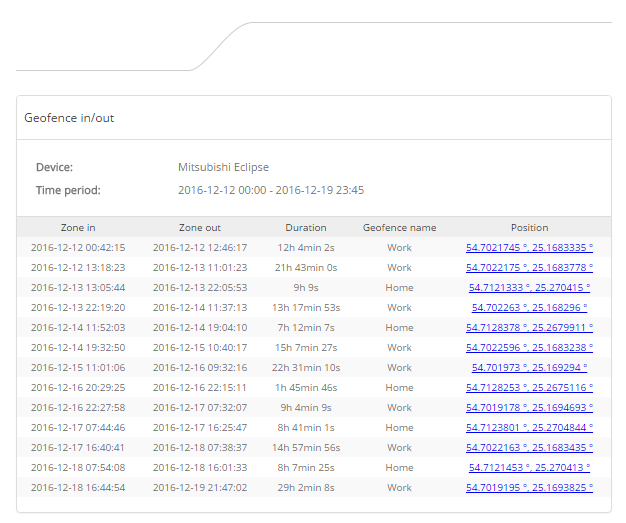
Summary of selected geofences for selected devices.
Geofence In/Out 24-hour mode report:
Standard geofence report:
- In time: 12.00 hours 21.1.2016
- Out time: 8.00 hours 22.1.2016 – spent time 20 hours
24-hour mode: spent time is being separated at midnight:
- In time: 12.00 hours 21.1.2016
- Out time: 0.00 hours 22.1.2016 – spent time 12 hours
- In time: 0.00 hours 21.1.2016
- Out time: 8.00 hours 22.1.2016 – spent time 8 hours
Geofence In/Out (Ignition ON/OFF)
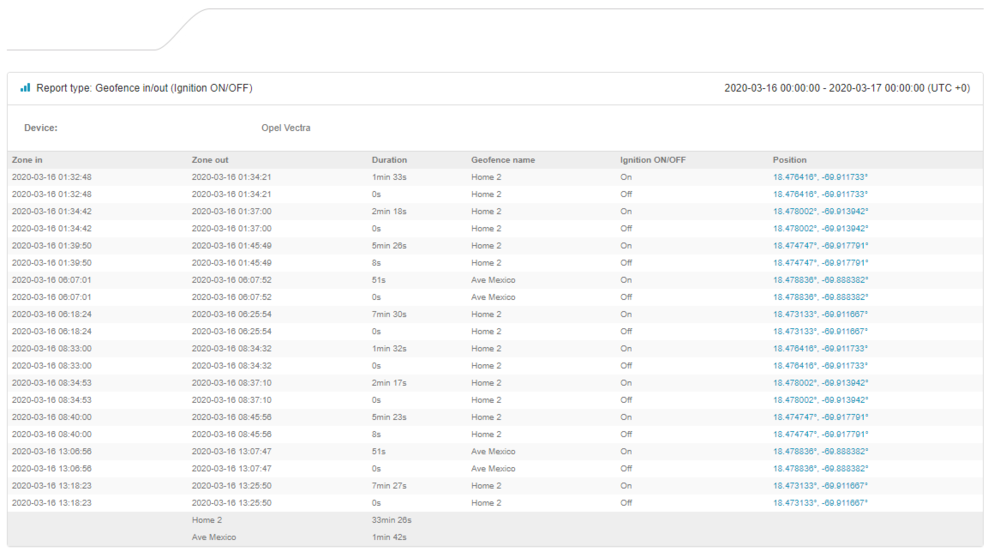
Similar layout to the in/out report, but with an additional column stating the ignition status.
Geofence (Touch All)
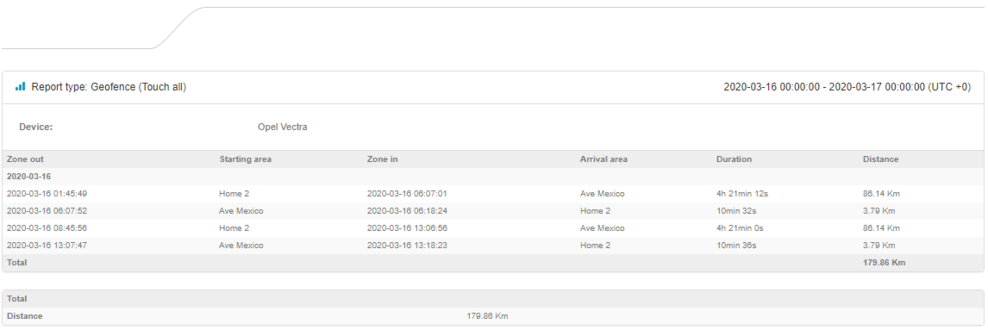
This report type only generates if the device has entered/exited all of the selected geofences during the specified period.
Ignition ON/OFF
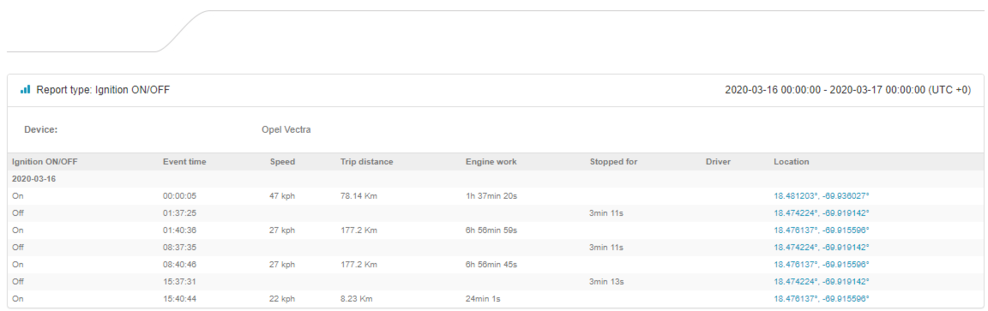
This report displays when the ignition of the vehicle was turned on and off. It also displays when the event occurred, the average speed during the trip, trip distance, and total engine hours. When the ignition is off, it also displays the amount of time it was turned off and the location.
Overspeed
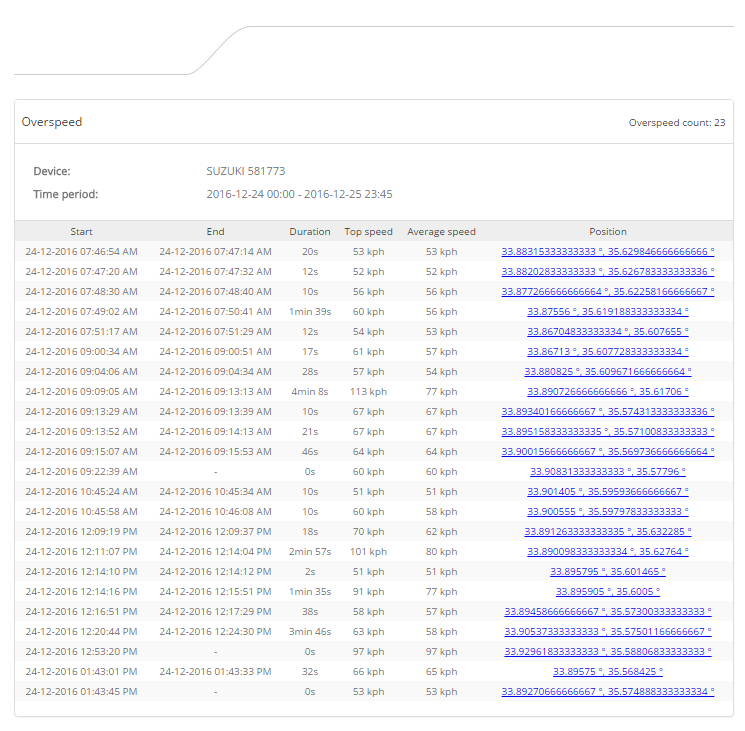
Before generating this report, the speed limit must be set. Speed above the limit will be counted as overspeed. The underspeed report is almost the same – it counts values below the speed limit.
Overspeed / Geofences
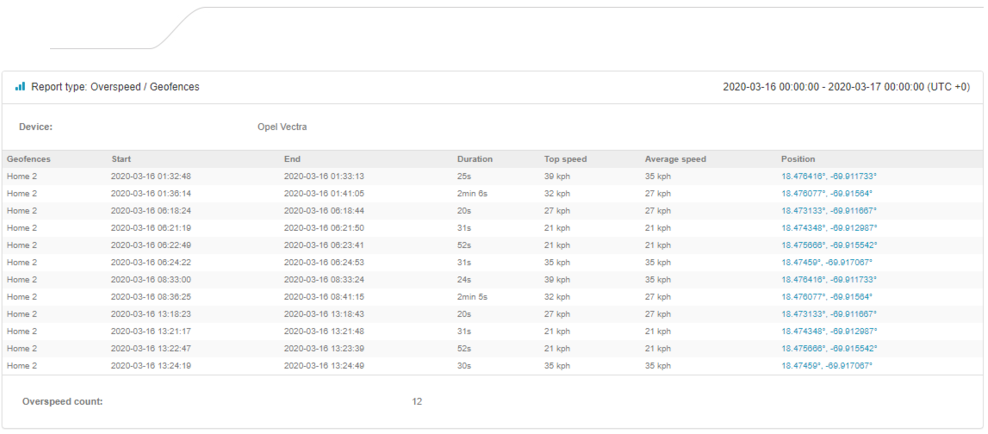
This report displays overspeed information in selected geofences. The layout is the same as the Overspeed report.
RAG (Driver’s Performance)

Harsh braking and harsh acceleration sensors must be configured first in order for this report to be generated. Final scores are calculated in an Excel file by formula. You can adjust that formula any time.
Temperature
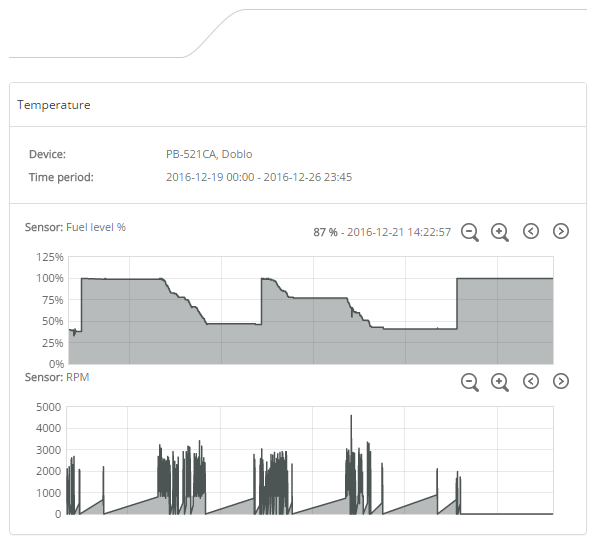
At least one sensor with a temperature template must be created. You can create multiple sensors using the temperature template and all those sensors will be shown in the report.
Travel Sheet
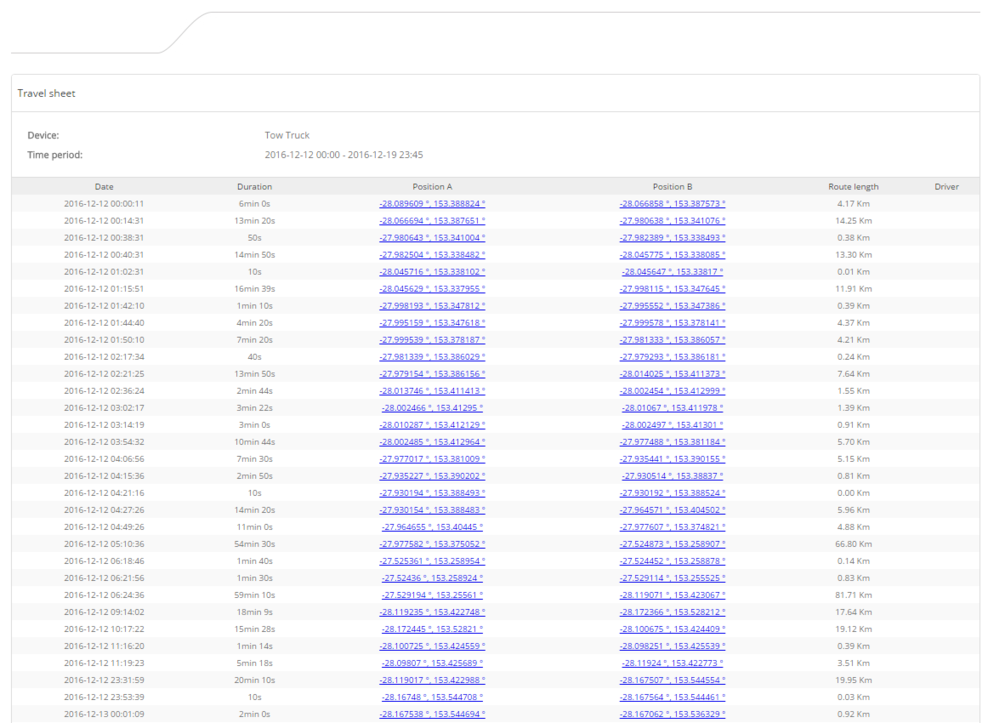
Summary of all travels of the device for the selected period of time. By clicking on the coordinates you will be redirected to the map. It is also possible to see the address instead of coordinates if you tick the “show addresses” tickbox while generating the report.
Travel Sheet Custom

Similar layout to the Travel Sheet report, but with additional information fields.
Routes
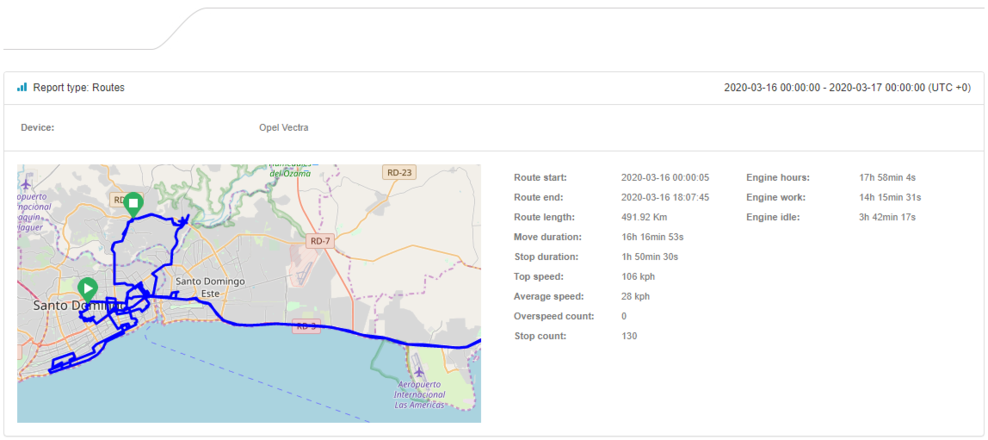
The routes report represents the whole route that the vehicle drove with a map embedded. It also provides relevant information such as the total distance traveled, top speed, average speed, and stop count.
Sent Commands

With this report, you can generate a list of commands that all the users from your platform have executed and their status.
Work Hours Daily

A basic report that states the travel time, start and end times, and distance traveled.