STEP 1:
INSTALLING YOUR GPS TRACKER
PROFESSIONAL INSTALLATION RECOMMENDED
For more advanced features like connecting the ignition wire and enabling engine blocking, it is recommended to seek professional installation to ensure proper functionality and safety.
MOUNTING THE DEVICE
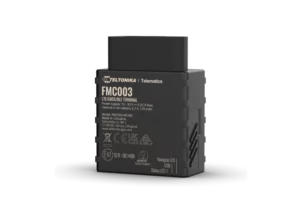
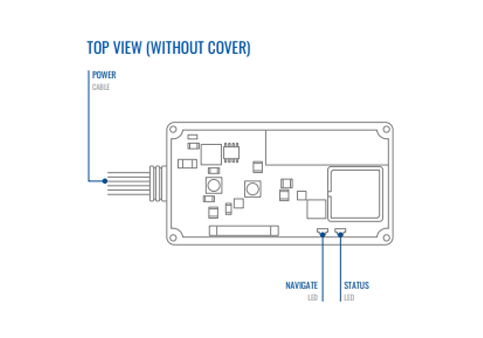
The Teltonika FMC920 tracker is designed for flexible installation within your vehicle. Select a concealed location, such as under the dashboard or behind interior panels. Use double-sided tape or other secure methods to attach the device, ensuring that the wires and connections are not easily visible.
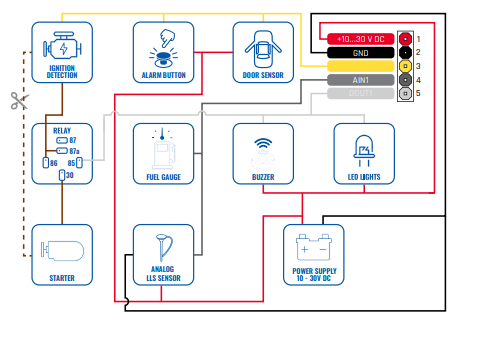
CONNECTING THE WIRES
- Secure Wiring: Fasten the wires to existing wiring or non-moving parts, keeping them away from heat sources and moving components.
- Concealed Connections: Ensure connections are discreet, reapplying insulation where necessary, especially if factory insulation was removed.
- Exterior Protection: If wires are exposed to external elements like heat, moisture, or dirt, apply additional insulation to protect them.
- Avoid Sensitive Connections: Do not connect the wires to the vehicle’s board computers or control units.
CONNECTING THE POWER SOURCE
- Power Availability: Ensure the chosen power wire remains active even after the vehicle’s computer enters sleep mode, which can take between 5 to 30 minutes.
- Voltage Check: After connecting the module, recheck the voltage to confirm it hasn’t dropped.
- Fuse Box Connection: It’s recommended to connect to the main power cable in the fuse box, using a 3A, 125V external fuse.
CONNECTING THE IGNITION WIRE
- Identify the Correct Wire: Ensure the wire selected is the true ignition wire, retaining power after the engine starts, and not an ACC wire (which only supplies power when the key is in the first position).
- Relay Connections: Connect the ignition wire to the ignition relay output, or alternatively, any relay with power output when the ignition is on.
CONNECTING THE GROUND WIRE
- Proper Grounding: Connect the ground wire to the vehicle frame or metal parts secured to the frame.
- Bolted Connections: If using a bolt, attach a loop to the end of the wire and secure it. For better contact, remove any paint from the connection spot.
By following these guidelines, you can securely install your Teltonika FMC920 tracker and ensure it operates effectively within your vehicle.
STEP 2:
GET ACCESS TO THE XTRACK APPLICATION
- Visit: https://xtrackapp.com/registration/create

- Register your account.
- Check your email for your login credentials.
- Sign in at https://xtrackapp.com, using your email and the password provided.
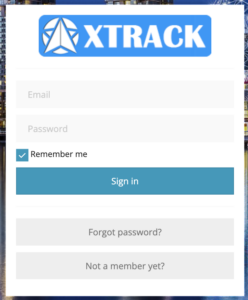
- Select your preferred plan and complete the payment.
- Gain instant access to the XTRACK system.
Step 3:
START TRACKING
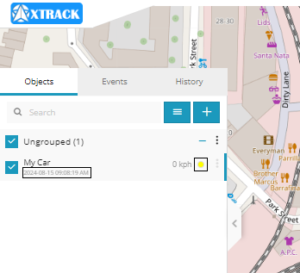
- Add a New Device: On the left panel, navigate to the “Devices” tab and click the “+” icon.
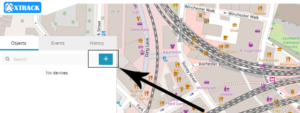
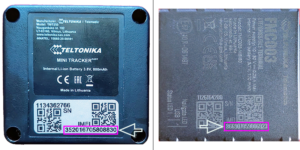
- Enter Device Details: A new popup will appear. Choose a name for your device and enter its IMEI number, which is located on a sticker/printed on the device.
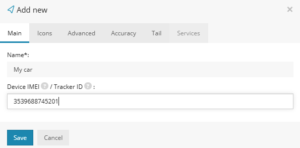
- Save the Device: After filling in the details, click “Save.” The device will then appear in your device list.
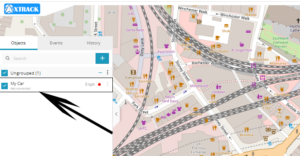
- Automatic Configuration: Your device comes preconfigured and will automatically connect to the XTRACK server. Please allow a few minutes for the server to receive the first data packet from your device.